



You want your EPDM roof to last. That is the bottom line. The membrane itself is durable, flexible, and proven in the field. But no amount of quality material can compensate for a poorly prepared roof deck. A failing or uneven substrate will compromise adhesion, cause blisters, bubbles, and eventually lead to leaks. In short, the success of any EPDM Roofing Installation depends entirely on what lies beneath.
We are talking about the roof deck, whether wood, concrete, or metal, and the foundation that supports your membrane. Skipping or rushing this step is the single most common and costly mistake property owners make. Proper preparation is essential for a long-lasting roof. Following best practices for EPDM Roofing Installation Parma ensures every step is done correctly. Get it right, and your roof can reach 30 years or more. Get it wrong, and you may face failures in just a few seasons.
Why the Roof Deck Matters
The roof deck is the foundation for your EPDM system. Think of it like the base of a table. If it is warped, soft, or wet, everything on top suffers.
In a fully adhered EPDM system, the membrane is glued directly to the deck or insulation. The bond between the adhesive and substrate is critical. Any dirt, dust, moisture, or rough spot prevents proper adhesion. When that happens, the membrane can shift, bubble, or shrink, especially around edges and penetrations.
Industry data shows that improper deck preparation contributes to over 40% of premature single-ply roofing failures. That is a huge, avoidable risk.
Understanding Common Failure Points
Most property owners focus on membrane thickness, seams, or material type. The real weak point is almost always the deck.
Improper preparation leads to three major issues:
Step 1: Pre-Inspection
- Blistering: Moisture trapped under the membrane vaporizes under sunlight, forming bubbles.
- Poor seam adhesion: Seams that are not bonded to a clean, dry surface fail, causing leaks.
- Membrane shrinkage: Without a solid bond, the EPDM can pull away from edges, exposing vulnerable areas.
The deck dictates how well the EPDM performs long-term.
Before touching the membrane, conduct a thorough inspection of the deck. Look for:
- Moisture: Dark stains, soft spots, or mold indicate trapped water.
- Structural integrity: Boards should be secure, fasteners tight, and no sagging areas present.
- Surface irregularities: High spots, low spots, protruding nails, or sharp edges.
- Material damage: Rot in wood, spalling in concrete, or corrosion on metal decks.
This step is your chance to identify everything that needs fixing before the EPDM installation begins.
Step 2: Moisture Detection and Management
Water is the enemy. You cannot install EPDM over a wet deck. Moisture causes blisters and adhesive failure.
Detection methods
- Electronic moisture meters: Measure electrical resistance to determine moisture levels.
- Core sampling: Cut small sections to check for wet insulation or damaged decking.
If moisture is present, allow the deck to dry completely. In many cases, saturated layers must be removed down to the dry structural deck.
Step 3: Structural Integrity Check
A deck must support the roof system and any traffic.
- Wood decks: Replace rotted or soft sections. Ensure boards are firmly attached to joists.
- Metal decks: Check for corrosion and tighten loose fasteners.
- Concrete decks: Fill cracks and repair spalled areas.
Any movement or flex will stress the EPDM and shorten its lifespan.
Step 4: Remove Existing Materials
Most projects require stripping down to the bare deck.
- Remove old membranes, insulation, ballast, and flashing.
- Overboarding is acceptable only if the deck is structurally sound and dry.
- Petroleum-based residues from old asphalt or bitumen must be removed or isolated because EPDM is incompatible with these materials.
A clean, bare deck ensures a solid adhesive bond.
Step 5: Cleaning and Priming
The deck must be spotless. Dust, dirt, or grease blocks adhesion.
- Sweep, vacuum, or blow debris off the surface.
- Sand down rough spots and round sharp corners or edges to at least a ½-inch radius.
- Prime concrete or porous wood if required by the EPDM manufacturer. This improves the chemical bond.
Step 6: Smooth and Fill Irregularities
A smooth deck prevents stress points in the membrane.
- Fill gaps greater than ¼ inch with wood strips or rigid patching compounds.
- Use joint fillers for small cracks.
- Ensure the surface is flat across the entire roof.
Continuous support under the membrane is critical.
Step 7: Selecting the Right Substrate
Not all decks perform the same.
- OSB or plywood: Excellent for fully adhered EPDM. Use exterior-grade panels, ⅝-inch minimum thickness.
- Concrete: Must be cured, smooth, and dry. Cleaning and priming are essential.
- Metal: Typically requires a cover board or insulation layer to provide a flat surface and reduce heat transfer.
Substrate choice affects adhesion, durability, and long-term roof performance.
Step 8: Installing Insulation and Cover Boards
Adding insulation and a high-density cover board improves energy efficiency and creates an ideal surface.
- Protects insulation from damage.
- Provides a smooth, non-porous surface for adhesive bonding.
- It can act as a fire barrier depending on the material.
High-density gypsum or perlite boards are recommended. Secure them mechanically or with adhesive to prevent movement.
Step 9: The Role of Reliable Roofing & Restoration
EPDM installation requires expertise. Knowing which adhesives work with which substrates and understanding local codes for wind uplift and fastening patterns is critical.
At Reliable Roofing & Restoration, every deck undergoes a precise inspection using moisture meters, IR scanners, and visual assessment. All repairs, cleaning, and levelling are documented. This careful preparation ensures a long-lasting roof system.
Common Deck Preparation Mistakes
Avoid these to protect your investment:
- Ignoring moisture in the deck
- Leaving petroleum residues from old roofs
- Failing to round sharp corners
- Insufficient cleaning
- Applying adhesive outside the recommended temperature ranges
Even small errors compromise the EPDM system.
For More Information, you can Also Check What Is EPDM Roofing and How Does It Work?
Step 10: Final Checks Before EPDM Installation
Before laying the membrane:
- Reinspect for debris or wet spots.
- Confirm underlayment and cover boards are secure and level.
- Verify all edges, penetrations, and flashings are prepared.
This final quality control prevents costly post-installation problems.
Post-Installation Considerations
We are talking about the roof deck, whether wood, concrete, or metal, and the foundation that supports your membrane. Skipping or rushing this step is the single most common and costly mistake property owners make. Proper preparation is essential for a long-lasting roof. If you live in Brooklyn, you can find Reliable Roofing & Restoration. Get it right, and your roof can reach 30 years or more. Get it wrong, and you may face failures in just a few seasons.
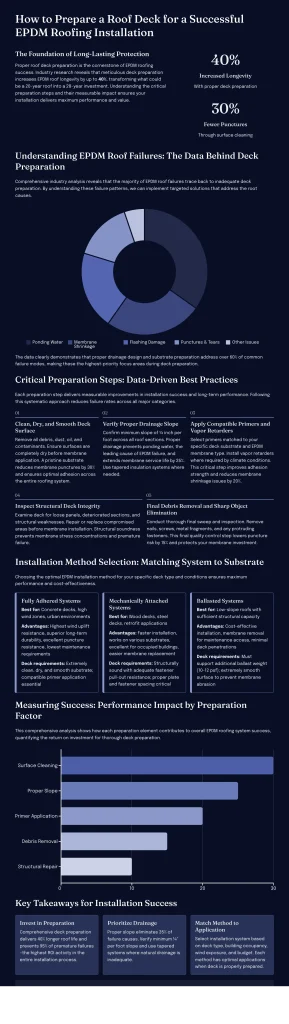
How to Prepare a Roof Deck for a Successful EPDM Roofing Installation: Key Statistics & Best Practices
- Proper Roof Deck Preparation Increases EPDM Roof Longevity by up to 40% (Source: EPDM Roofing Association & Holcim Elevate, 2025)
- Common Causes of EPDM Roof Failure Linked to Poor Deck Prep:
- 35% due to ponding water from inadequate slope
- 25% from membrane shrinkage caused by improper adhesion
- 20% from damaged flashings and seams due to poor substrate cleaning
- 15% from punctures and tears related to debris on deck
- Critical Preparation Steps & Their Impact on Installation Success:
- Ensure Roof Deck is Clean, Dry, and Smooth — reduces membrane punctures by 30%
- Verify Proper Slope (≥1/4 inch per foot) — prevents ponding water, extending membrane life by 25%
- Use Compatible Vapor Retarders and Primers — improves adhesion, reducing shrinkage issues by 20%
- Inspect and Repair Deck Structural Integrity — avoids membrane stress and premature failure
- Remove Debris and Sharp Objects Before Installation — lowers puncture risk by 15%
- Installation Method Impact:
- Adhered systems offer highest wind uplift resistance and durability
- Mechanically attached systems favored for wood/steel decks due to ease and speed
- Ballasted systems are cost-effective but require careful deck preparation to avoid membrane damage
- Visual Chart Suggestion: A stacked bar chart showing percentage contribution of each preparation factor to overall EPDM roof success and failure rates, highlighting how addressing each step reduces common failure causes.
Data compiled from 2024-2025 industry reports by EPDM Roofing Association, Holcim Elevate, and Roofing Kits Direct.
FAQs
1. How long should the EPDM membrane relax before adhesive application?
At least 30 minutes. This allows the material to expand or contract from packaging, preventing wrinkles.
2. Can EPDM go over asphalt shingles?
No. Shingles create uneven surfaces and contain petroleum that degrades EPDM. Always remove down to the deck.
3. What is the minimum slope for EPDM roofs?
1/4 inch per foot (1:48) is the standard to ensure positive drainage. Ponding water reduces lifespan.
4. How do I know if the adhesive is touch-dry?
Press your finger lightly. If adhesive strings or sticks, wait. A clean print indicates readiness.5. Are there temperature limits for EPDM installation?
Yes. Typically, avoid installation below 40°F (4.5°C) or above 120°F (49°C). Extreme temperatures compromise adhesive cure and bond strength.
